It’s a frustrating situation: you reach into the fridge for fresh lettuce, only to discover a block of ice. Or possibly your milk has frozen solid overnight. When your refrigerator suddenly starts freezing food, it is usually due to one of three factors: wrong temperature settings, obstructed airflow, or a faulty component. These issues break the precise balance your refrigerator need to keep food ideally cooled but not frozen.
Why Your Refrigerator Is Suddenly Freezing Everything
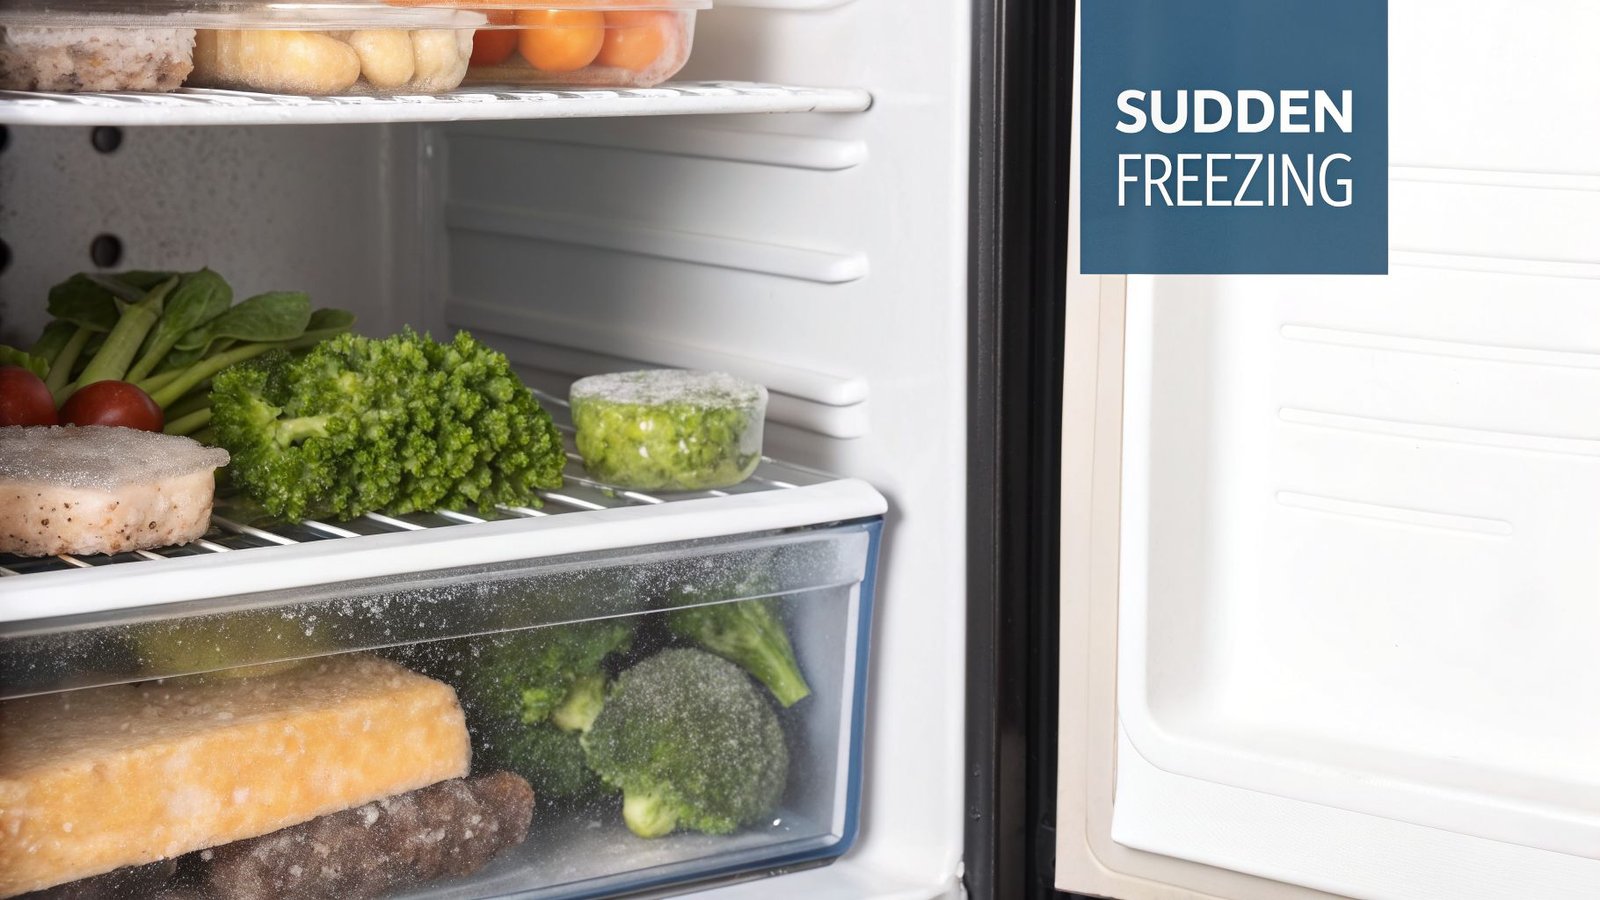
To maintain a consistent temperature, a refrigerator uses a continual flow of cold air. If the mechanism malfunctions, it may overcorrect, resulting in frozen and wasted food. A fridge that freezes everything is a typical complaint, and identifying the root cause is the first step toward resolving the issue.
Sometimes the solution is surprisingly easy and does not require any additional tools. In other circumstances, there is a clear indication that a specific component is failing. Understanding how to connect the symptom to the cause can help you save time and avoid replacing an appliance that simply needs minor repairs.
Common Symptoms and Their Likely Causes
To help you get to the bottom of it, this quick diagnostic table connects common freezing patterns to their likely causes. Use this as your roadmap to see if you’re dealing with a simple adjustment or one of the more common fridge problems that might need a technician’s touch.
| Symptom You're Seeing | Most Likely Cause(s) |
|---|---|
| Food freezing everywhere in the fridge | Incorrect temperature setting or a faulty thermistor (temperature sensor) |
| Only food at the back is freezing | Over-packing the fridge or blocked air vents preventing proper circulation |
| Ice buildup along interior walls | A poor door seal (gasket) letting in warm, moist air, forcing the system to overwork |
| Freezing is intermittent or unpredictable | Damper control is sticking, or the main control board is malfunctioning |
By identifying which scenario best matches your situation, you can focus your troubleshooting on the most probable cause. For instance, if only the lettuce you pushed to the back wall is frozen, airflow is the immediate suspect.
This guide will guide you through identifying each of these issues, beginning with the most basic DIY solutions and up to identifying situations that require professional repair. We will share simple, step-by-step guidelines to help you reclaim your fridge and reduce food waste.
Check Your Temperature Settings and Airflow First
Before we worry about a significant mechanical breakdown, let’s look at the two most common causes: temperature and airflow. These two faults are at the root of the majority of fridge freezing food incidents, and they can generally be resolved in minutes.
The problem frequently begins with a simple error—setting the thermostat dial to the coldest setting. It is a popular misconception that cooler is always better, but this is precisely what results in frozen lettuce and mushy milk.
To ensure optimum food preservation without freezing, keep your fridge’s fresh food area between 3°C and 4°C (37°F and 40°F). Anything colder risks freezing sensitive things, while anything warmer may cause spoiling.
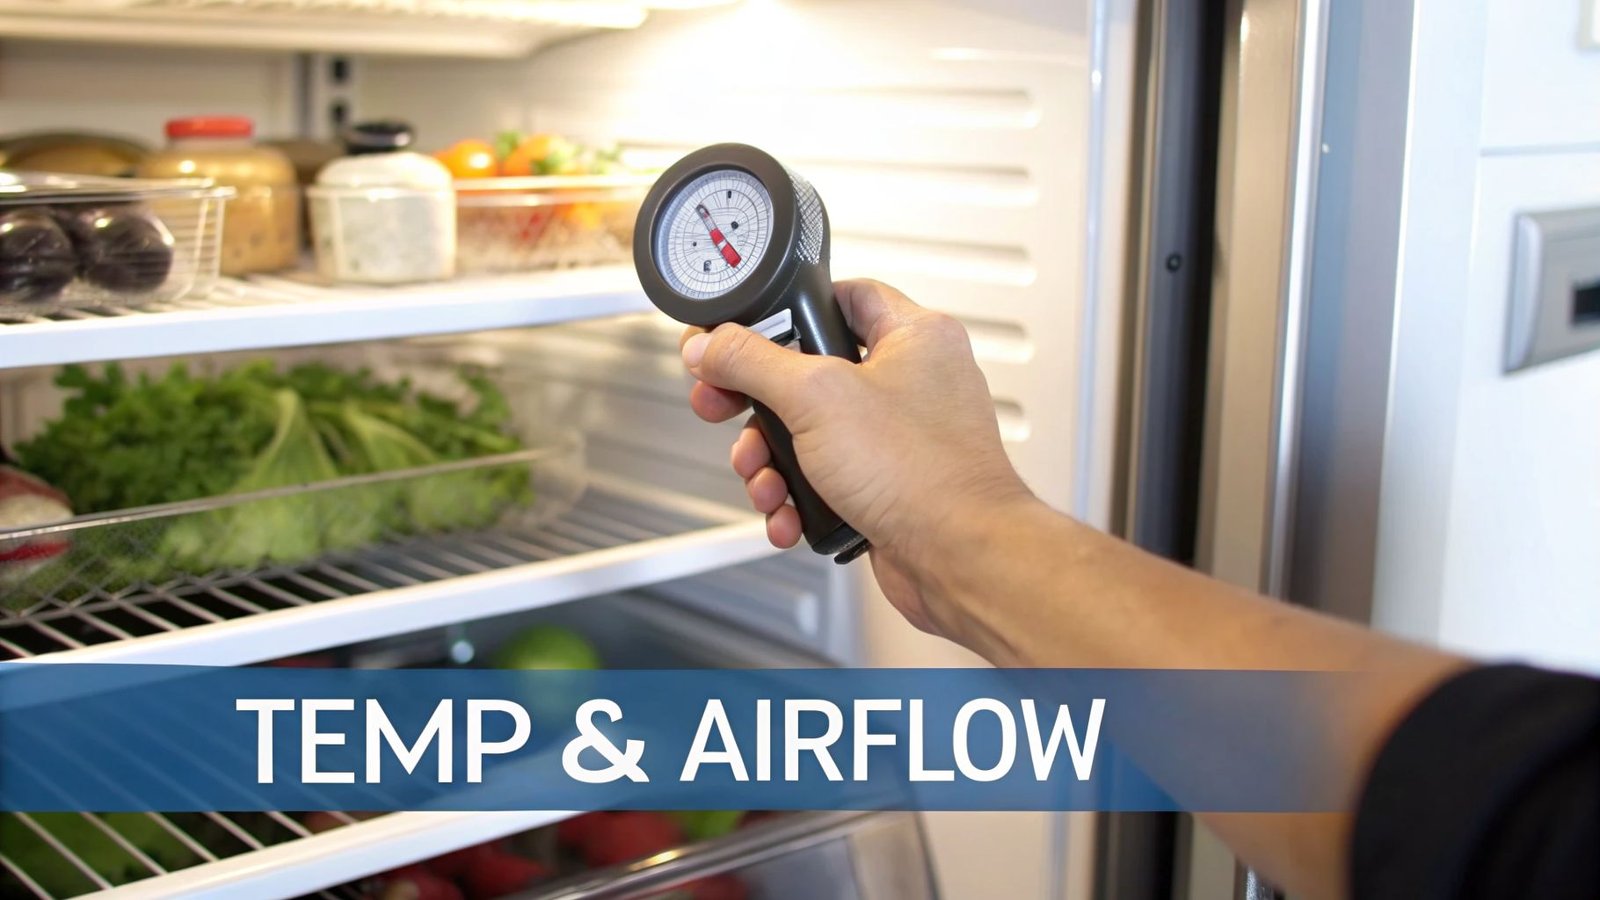
How to Correctly Set Your Refrigerator Temperature
The dial or digital display on your fridge is more of a guideline than a precise measurement. To get a true reading, you’ll need an appliance thermometer.
Here’s how to check and set your fridge’s temperature accurately:
- Get an Appliance Thermometer. These are inexpensive and available at most hardware or home stores.
- Place It Correctly. Put the thermometer in a glass of water and set it on the middle shelf. The water provides a stable reading of the food’s temperature, not just the air, which can fluctuate.
- Let It Stabilize. Leave the thermometer in the fridge for at least 5 to 8 hours—overnight is even better. Avoid opening the door during this time.
- Check and Adjust. Look at the thermometer. If the reading is below 3°C (37°F), adjust your fridge’s control dial or digital setting one increment warmer.
- Re-Check. Wait another 5-8 hours and check again. Keep making small adjustments until your thermometer stays consistently between 3°C and 4°C (37°F to 40°F).
Why Airflow Is Crucial for Preventing Frozen Spots
The second major cause is blocked airflow. The cold air in your fridge needs to flow freely to cool everything evenly. If you block its path, cold air pools in certain spots, creating isolated freeze zones.
This usually happens for two reasons:
- Over-packing: A fridge crammed with food prevents air from circulating. The cold air gets trapped, usually at the back or near the bottom, and starts freezing whatever it touches.
- Blocking Vents: Pushing groceries directly against the air vents is guaranteed to cause difficulties. This causes freezing air to blast onto close goods, flash-freezing them while the rest of the fridge may be excessively warm.
Airflow can be fixed without the use of any tools, just some smart organizing. Make sure to allow some space between your food and the fridge walls, particularly near the vents. Do not stack containers so high that they touch the shelf above. A little breathing room is frequently all you need.
For more details on temperature conversions, check out our guide to understanding your fridge’s temperature in centigrade. Simple adjustments like these are a powerful way to stop food from going to waste.
How a Faulty Door Seal Makes Your Fridge Work Overtime
It may seem paradoxical, but a space allowing warm air in can be the reason your food is turning to ice. The problem here is a damaged door seal, also known as a gasket. This flexible seal is intended to form an airtight barrier, keeping cold air in and warm, humid air out.
When the seal becomes filthy, brittle, fractured, or misaligned, it fails. Warm air from your kitchen penetrates inside, causing a constant battle with your appliance’s cooling system.
Your refrigerator’s sensors detect and react to the incoming warm air. In reaction, the control board instructs the compressor—the core of the cooling system—to run continuously in order to fight back.
This non-stop cooling cycle is what ultimately over-chills the entire compartment, freezing items closest to the cold air vents first.
The Simple Test to Check Your Door Seal
You don’t need fancy tools to determine if your door seal is the problem. A quick and easy method is the “dollar bill test” (any banknote will do). It’s a safe and effective way to find invisible gaps.
Here’s how to do it:
- Open your refrigerator door and place a banknote flat against the seal.
- Close the door on the banknote, leaving it about halfway in and halfway out.
- Gently try to pull the banknote out.
If you sense resistance, then that area of the seal is in good condition. However, if the bill slides out with no effort, you’ve discovered a weak point where warm air can enter. Repeat the test on all four sides of the door—top, bottom, and both sides—to identify any issue areas.
How to Clean and Maintain Your Gasket
Sometimes a failing seal is simply a dirty one. Spills, crumbs, and filth can accumulate on the gasket, making it rigid and preventing a tight seal. Before selecting a replacement, give it a thorough cleaning.
All you need is a soft towel and a solution of warm water and mild dish soap. Gently scrub the whole surface of the gasket, paying special attention to the accordion-like folds where filth accumulates. A soft-bristled toothbrush might help with persistent stains. Once clean, dry it with another cloth. A clean, pliable seal frequently restores proper function.
If you’re having similar issues with your freezer, the same principles apply. We have another guide for when your freezer door is not sealing properly that you might find helpful.
A poor seal doesn’t just waste food; it wastes energy. If cleaning doesn’t solve the problem and you see obvious cracks, tears, or hardened spots on the gasket, it’s time to replace it. This repair pays for itself by saving your groceries and lowering your power bill. For a refrigerator, a professional replacement is the best way to guarantee a perfect fit and a lasting fix.
Diagnosing a Faulty Thermistor, Damper, or Control Board
Even after checking the temperature indicators, making sure the vents are clear, and testing your door seal with a dollar bill, you’re still discovering frozen food.
If the simple solutions don’t work, there is probably a specific defective component. A group of parts in your refrigerator work together to keep it at the right temperature. The entire system may be thrown off when one of them malfunctions, which frequently results in over-cooling.
Let’s examine the primary offenders: the main control board, the damper, and the thermistor. You can determine what’s going on by understanding what they do and how they fail. Even though you can identify the symptoms, a qualified technician should replace these parts.
The Thermistor: The Fridge’s Thermometer
The thermistor is your refrigerator’s internal thermometer. It’s a small sensor that monitors the air temperature and reports back to the main control board. The board uses that information to decide when to turn the cooling system on or off.
When a thermistor fails, it feeds the control board bad information. If it incorrectly signals that the temperature is too high, the board will force the compressor and fans to run nonstop. The result? A deep freeze in your fresh food section.
You might be dealing with a bad thermistor if:
- Everything is freezing: Food is frozen throughout the fridge, not just in one spot.
- The fridge runs constantly: You notice the motor humming away without ever cycling off.
- Wild temperature swings: Your fridge alternates between being an icebox and not being cold enough.
A faulty thermostat or thermistor is a significant issue.
The Damper Control: The Gatekeeper of Cold
The freezer generates all of the cold air in the majority of refrigerators. A tiny, motorized door called the damper control opens and closes to allow the proper quantity of frigid air to enter the fresh food area. The damper opens when the thermistor indicates that cooling is required. It closes when the desired temperature is attained.
An uncontrolled blast of arctic air enters the refrigerator if the damper breaks or becomes stuck wide open. Anything in its path will become frozen as a result.
Whether it’s a malfunctioning damper or a leaky door seal, this flowchart can help you see the reasoning behind any airflow problem.
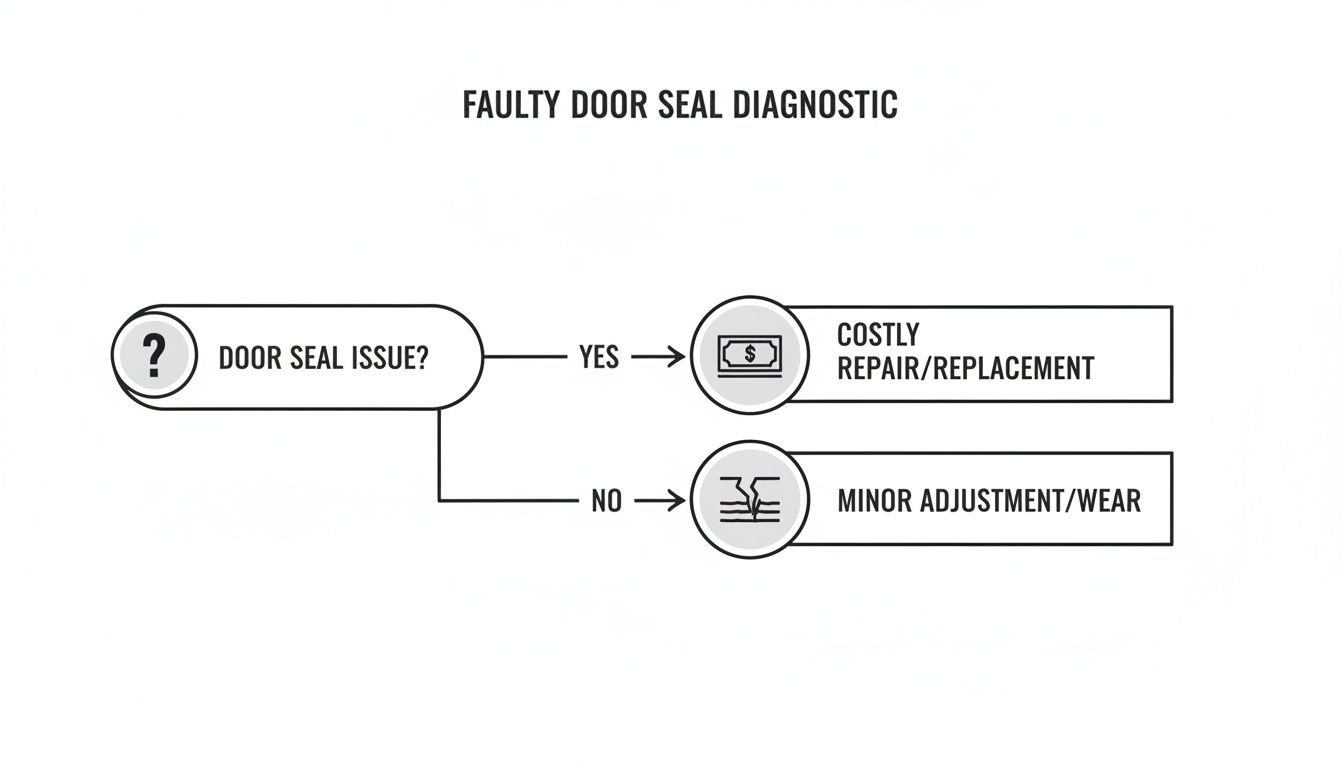
The key takeaway is that figuring out where the unwanted air is coming from—warm air sneaking in or cold air blowing uncontrollably—is the first step. It tells you whether you’re looking at a simple adjustment or a component failure.
Watch for these signs of a broken damper:
- Frozen patches: Items near the air vent are frozen solid, but the rest of the fridge is fine.
- Frost buildup: You see ice forming on or around the damper assembly inside the fridge.
- It’s unresponsive: Changing the temperature setting does nothing to stop the freezing.
The Main Control Board: The Brains of the Operation
The main control board is your refrigerator’s brain. It processes signals from sensors (like the thermistor) and tells all the parts what to do (like opening the damper or running the compressor). It’s the conductor of the entire cooling system.
A bad control board is less common than a thermistor or damper failure, but when it goes, it can cause all sorts of strange problems, including over-freezing. If a relay on the board gets stuck, it might send continuous power to the cooling system, regardless of what the sensors are saying.
Safety Warning: Accessing the thermistor, damper control, or main control board involves your fridge’s wiring. This is not a DIY job. It requires electrical testing with a multimeter and could involve the sealed refrigerant system, which can only be handled by a licensed professional.
A failing main board can often mimic other problems, making it difficult to diagnose without the right tools. If you’ve checked all the simple fixes and your fridge is still acting up, it’s time to call a technician. They can safely test the components, identify the real cause, and prevent further damage. If you want to dive deeper into how the cooling system works, you can learn more about the compressor and its function in our other article.
Failing Parts and Their Symptoms
This table should help you narrow down the possibilities before deciding to call a professional.
| Component | What It Does | Common Symptoms of Failure | DIY Check or Pro Repair? |
|---|---|---|---|
| Thermistor | Monitors air temperature and reports to the control board. | Widespread freezing, fridge runs constantly, major temperature swings. | Pro Repair: Requires electrical testing and replacement. |
| Damper Control | Opens/closes a vent to let cold air from the freezer into the fridge. | Freezing is localized near the vent, visible frost on the damper. | Pro Repair: The part is usually inside the fridge liner and needs professional replacement. |
| Main Control Board | The "brain" that controls all refrigerator functions. | Mimics other failures; erratic behavior, constant running, freezing. | Pro Repair: This is definitely a job for a professional, as it's the most complex component. |
Ultimately, if you’ve done the basic checks and are still unsure, it’s safer and more efficient to have an expert take a look. A technician can test these components with certainty and get your fridge back to just chilling—not freezing.
When You Must Call a Professional Technician
Knowing your boundaries is essential for both your safety and the condition of your refrigerator, even though it feels fantastic to fix an appliance issue on your own. There is a distinct difference between a safe do-it-yourself inspection and a repair that requires a licensed professional.
Without the right knowledge and equipment, attempting to resolve complicated mechanical or electrical problems could result in electrical shock, irreversible damage to your refrigerator, or a terminated warranty. It’s time to contact an expert if you’ve finished the fundamental inspections and believe an internal component has failed.
The Clear Boundaries for Professional Repair
Here’s the bottom line: if the fix involves removing interior panels, touching any wiring, or getting near the sealed cooling system, you need a certified technician. They are trained to handle live electrical circuits and high-pressure refrigerant systems.
You must call a professional in these situations:
- Testing with a Multimeter: Checking a thermistor, damper, or control board for voltage or continuity is not a DIY job. A wrong move can damage sensitive electronics, turning a simple repair into a costly one.
- Replacing Electrical Components: Swapping parts like control boards or sensors involves dealing with live wires. This is dangerous work that should only be handled by a trained professional.
- Accessing the Sealed System: The compressor, condenser, and refrigerant lines form a closed loop. By law, only a licensed technician can service these components.
- Removing Interior Panels: Accessing parts like the evaporator fan or damper assembly often requires disassembling the inside of your fridge. A technician knows how to do this without breaking the delicate plastic clips and liners.
A professional technician doesn’t just replace a part—they find out why it failed. For example, a faulty control board might be a symptom of a short circuit elsewhere. Simply replacing the board without fixing the root cause means the new one will fail too.
The Value of a Certified Technician
Hiring a professional saves you time, prevents bigger problems, and ensures the job is done correctly. A certified technician arrives with specialized diagnostic tools that can pinpoint the exact failure much faster than guesswork.
They also have access to Original Equipment Manufacturer (OEM) parts. Using the correct OEM part is essential, especially for premium brands. A generic part might not fit correctly, perform properly, or last as long.
A qualified expert ensures your refrigerator is repaired to manufacturer specifications, making it efficient and reliable again. If you’re unsure about your situation, our guide on when to call an appliance repair technician has more details. Trusting an expert is the safest and most effective way to solve a fridge that’s freezing your food.
Your Top Questions About a Freezing Fridge, Answered
Even after checking the obvious causes, some tricky questions can remain. Here are our direct answers to the most common questions we hear on the job.
Why Is Only the Food at the Back of My Fridge Freezing?
This is a classic airflow problem. Cold air is blown into the fridge through a specific vent, usually located at the back of the fresh food section.
When you push a carton of milk or a bag of carrots directly against that vent, you block it. The blast of freezing air has nowhere to go but straight into whatever is in its path, flash-freezing your lettuce while the front of the fridge might feel a bit warm.
The fix is usually simple: pull your groceries a few centimetres away from the back wall so air can circulate properly. If that doesn’t solve it, the problem might be mechanical, like a damper control door that’s stuck open. That’s a job for a technician to diagnose.
Can a Faulty Ice Maker Cause My Fridge to Freeze Food?
A malfunctioning ice maker can interfere with your entire system and cause freezing, however it’s not the most frequent cause.
Occasionally, a little, gradual leak appears in the water line of the ice maker. As a result, ice may accumulate where it shouldn’t, obstructing air vents or encasing a temperature sensor in ice that distorts its data.
The ice maker has a thermostat of its own in other variants. The main board may receive inaccurate information if that sensor malfunctions, indicating that the temperature is too high. In reaction, the technology turns your refrigerator into a freezer by continuously running the compressor. Turning off your ice maker for 24 to 48 hours is an excellent test. You’ve probably identified the issue if the freezing quits.
My Fridge Is Brand New—Why Is It Freezing My Food?
It’s annoying to discover a frozen cucumber in a brand-new refrigerator. There are a few things to look for before assuming it’s broken.
Give it some time first. After being plugged in, a new refrigerator may take up to 24 hours to completely settle its interior temperature. Temperature fluctuations are common throughout that initial cooling-down phase.
Check the settings after that. During shipping and installation, control dials can easily be pushed to the coldest setting. Use a different thermometer to confirm that it is set to the manufacturer’s recommended temperature, which is often approximately 3°C (38°F).
Finally, make sure the fridge is level. If it’s tilted, the doors might not be sealing tightly. Warm air gets in, the compressor works overtime to compensate, and you end up with frozen food. If none of these quick fixes work after a day or two, it’s time to use your warranty. It could be a rare defect like a faulty sensor, which the manufacturer will need to fix.
If you’ve tried these fixes and your refrigerator is still acting like a freezer, it’s time to call in the experts. The team at Advance Appliance Ltd has the training, tools, and stocked parts to diagnose the problem correctly and fix it fast. Don’t let your groceries go to waste—book now your service online today.