
Before you even think about picking up a tool, let’s talk about safety. It’s the absolute most important part of any gas cooktop repair. While simple fixes like cleaning a burner are definitely doable, working with a gas appliance isn’t something to take lightly. The golden rule? If you smell gas, stop everything.
Starting Your Repair with Safety First
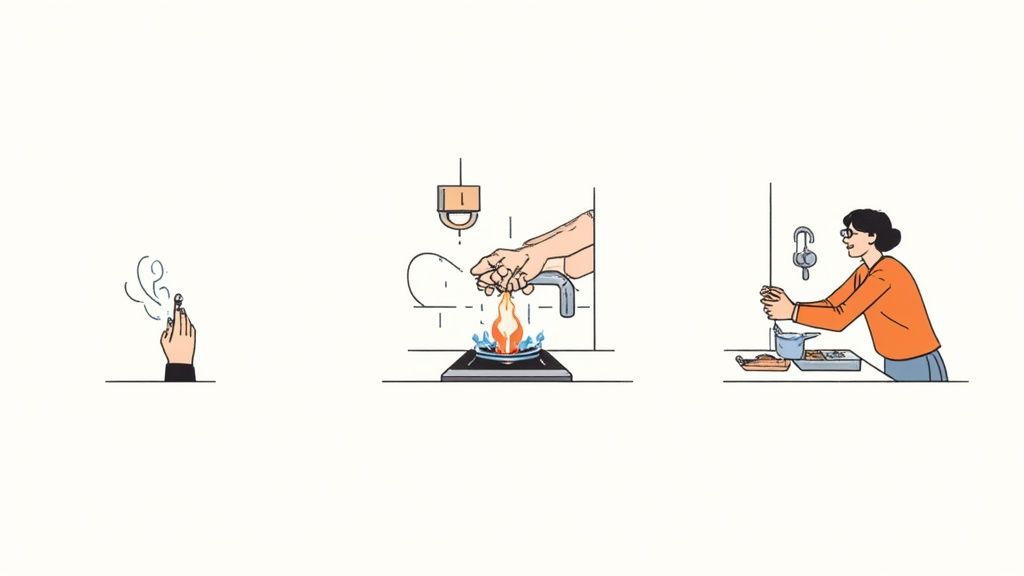
A methodical and cautious approach is non-negotiable. The risks are real, but following the right steps means you can tackle small jobs without putting yourself or your family in danger. That faint smell of rotten eggs—the tell-tale sign of a natural gas leak—is your signal to act immediately.
What to Do If You Smell Gas
If you suspect a gas leak, your one and only priority is to get everyone out of the house. Don’t touch anything that could create a spark. That means no flipping light switches, no using your phone, and no unplugging appliances.
Once you’re safely outside and a good distance away, call your gas utility’s emergency line. They’ll send someone out right away to find the leak and shut off the gas. Don’t go back inside until a professional has given you the all-clear.
The Pre-Repair Safety Checklist
For any hands-on work, from a deep clean to a minor repair, you need to completely cut off the cooktop from its power sources. This isn’t optional; it’s a mandatory two-step process.
- Shut Off the Gas: First, find the gas shut-off valve for your cooktop. It’s usually in the cabinet directly below or behind the appliance. To shut it off, turn the handle so it’s perpendicular (at a right angle) to the pipe.
- Cut the Electrical Power: Even though it’s a gas cooktop, the ignition system runs on electricity. Head to your home’s main electrical panel, find the circuit breaker for the cooktop, and flip it to the “OFF” position.
A mistake we see people make is thinking that if the flame is off, it’s safe to work on. The igniter can still hold a charge and create a spark, which is incredibly dangerous around even a small amount of residual gas. Always, always disconnect both.
Before you start, grab some basic safety gear. A good pair of non-slip gloves will protect your hands and give you a better grip, and safety glasses are a must to shield your eyes from any cleaning chemicals or loose debris. Honestly, knowing is it safe to repair your own appliances is the first real step to a successful repair. Getting this prep work right not only keeps you safe but also helps you focus on fixing the problem.
DIY vs Professional Gas Cooktop Repair
Deciding whether to grab your tools or call a pro can be tough. This table breaks down common issues to help you make a safe and informed choice.
| Problem | Potential DIY Fix | When to Call a Professional | Safety Level |
|---|---|---|---|
| Clogged Burner/Uneven Flame | Cleaning burner ports with a pin or brush. | After cleaning, the flame is still yellow, weak, or uneven. | Low-Risk DIY |
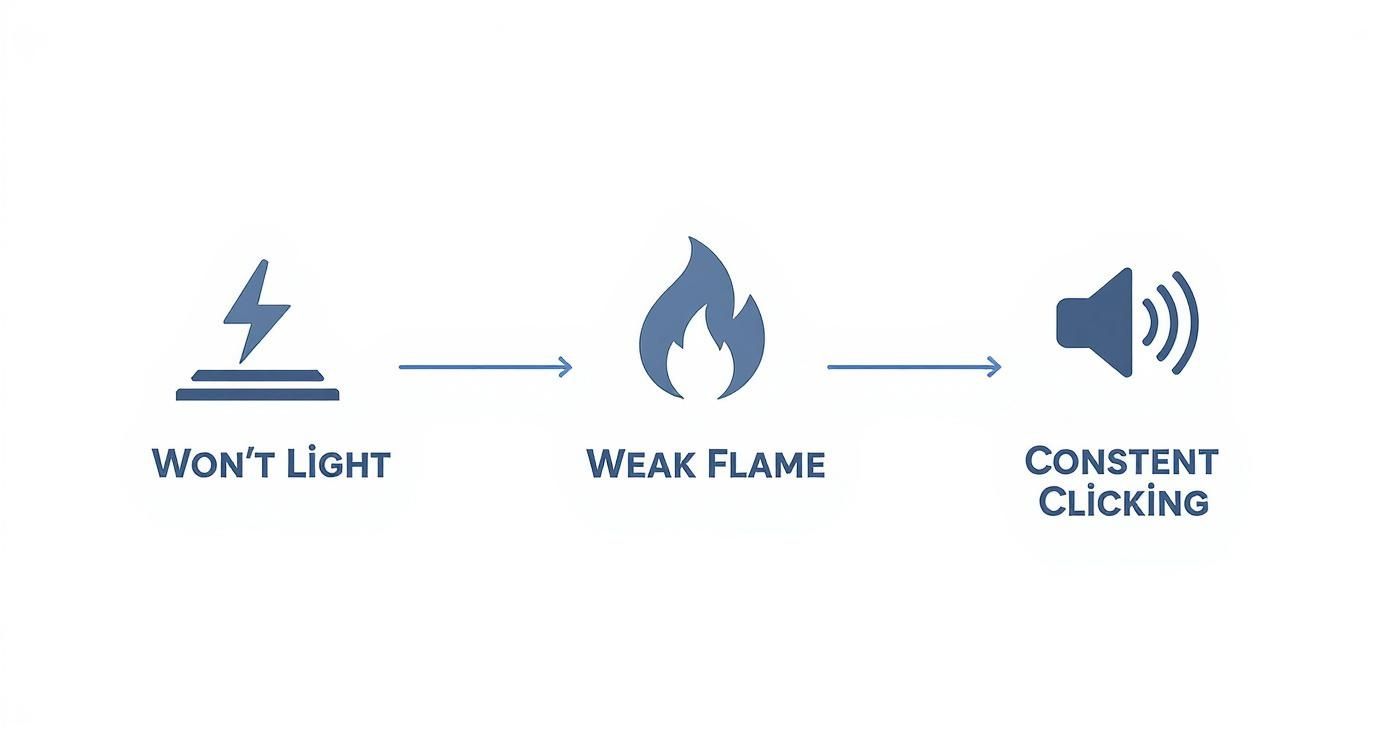
| Igniter Clicks but Won’t Light | Cleaning the igniter and burner of food debris or moisture. | If cleaning doesn’t work, indicating a faulty igniter or spark module. | Low-Risk DIY |
| No Clicking Sound at All | Checking if the cooktop is plugged in and the circuit breaker is on. | If power is confirmed but there’s still no spark; suggests electrical issues. | Call a Pro |
| Knob is Stuck or Broken | Cleaning around the knob shaft; replacing a physically broken knob. | If the valve itself is stiff or damaged; requires specialized work. | Low-Risk DIY |
| Smell of Gas When Cooktop is OFF | EVACUATE & CALL 911/GAS CO. IMMEDIATELY | DO NOT ATTEMPT REPAIR. THIS IS AN EMERGENCY. | EXTREME DANGER |
| Smell of Gas ONLY When On | Tightening the connection to the burner (if you have experience). | Always. This indicates a leak in the supply line, valve, or regulator. | Call a Pro |
| Surface Gets Unusually Hot | Ensuring proper cookware size and placement. | If the unit overheats, suggesting a regulator or ventilation problem. | Call a Pro |
Ultimately, if a repair involves touching the gas line, electrical wiring, or internal control modules, it’s time to put the tools down. Your safety is worth far more than saving a few dollars. When in doubt, call a certified technician.
How to Diagnose Common Cooktop Problems
Every cooktop has its own quirks, and when something goes wrong, it usually leaves a trail of clues. Before you even think about picking up a tool for a gas cooktop repair, you need to play detective. Figuring out the why behind the problem is the first step and saves a ton of time, frustration, and money on parts you didn’t even need.
The most common call we get is for a burner that just won’t light. Nine times out of ten, the culprit is the simplest one: a recent spill. A little boil-over from a pot of pasta or some spattered grease can easily block the tiny igniter, stopping the spark in its tracks. It can also clog the burner ports where the gas escapes. A quick check and clean solves more problems than you’d think.
But what if you’ve cleaned everything and it’s still not cooperating? It’s time to listen. Turn the knob and pay close attention. Do you hear that steady click-click-click of the igniter trying to do its job? If you hear the clicks but don’t see a spark, the igniter itself could be wet, dirty, or just knocked out of position.
Pinpointing Ignition Failures
That familiar clicking sound without a flame means we need to dig a little deeper. If there’s no visible spark jumping to the burner head, the issue is often with the spark igniter itself. Take a close look at its white ceramic casing. If you spot any cracks or damage, that’s your problem. Even a hairline fracture can cause the spark to ground out on the metal cooktop frame instead of reaching the burner where it’s needed.
Now, what if you turn the knob and get… silence? No clicks, no sound at all. That points to a problem further down the line, likely in the cooktop’s electrical system. This could mean a faulty spark module—the brain that sends the electrical pulse to all the igniters. It could also be a bad switch connected to the knob or a simple wiring issue.
Here’s a key giveaway: If the clicking just won’t stop, even after the burner is lit or when all the knobs are turned off, you’ve got a clear signal. This almost always points to a malfunctioning spark module or a short circuit. It’s something you’ll want to address quickly before it burns out the entire ignition system.
Decoding Weak Or Uneven Flames
Another common clue we see is a weak, sputtering, or uneven flame. Instead of that beautiful, crisp ring of blue fire, you get lazy yellow or orange flames. Sometimes, the flames are tall on one side of the burner and barely there on the other. This isn’t an electrical problem; it’s a fuel and air mix issue.
The most frequent cause? Clogged burner ports. Over time, grease and tiny bits of food bake into the small holes around the burner head, choking off the gas flow. A thorough cleaning with something small like a paperclip or a stiff-bristled brush is often all it takes to bring the flame back to its full, even strength.
For a deeper dive into common appliance hiccups, check out our guide on the top five range and stove problems and how to fix them.
Fixing Burner and Ignition Issues Yourself
Now that you’ve got a good idea of what’s going on, you’re ready to roll up your sleeves and tackle the most common DIY fixes. You’d be surprised how many of our repair calls come down to simple grime and misalignment—problems you can often solve yourself with a little patience. These steps are my go-to for solving the vast majority of cooktop headaches.
Your first move, and often the most effective one, is to give the burner components a deep clean. Over time, grease, food spills, and boil-overs bake onto the burner heads and caps. This gunk is the number one enemy of a healthy flame, as it blocks the gas flow and smothers the igniter’s spark.
Start by carefully removing the burner cap and the burner head underneath it. They should lift right off without needing any tools.
Give these parts a good soak in warm, soapy water for about 20 minutes. This will loosen up all that stubborn, baked-on residue. If you’re dealing with some really tough spots, a non-abrasive scrub brush will be your best friend here.
Clearing Clogged Burner Ports
After a good soak and scrub, this next part is crucial: making sure the burner ports are completely clear. These are the tiny holes where the flame actually comes out. Even one blocked port can cause an uneven, sputtering flame or stop it from lighting at all.
A straightened paperclip or a stiff-bristled brush works perfectly for this. Gently poke the tip into each port to dislodge any debris. Whatever you do, don’t use a wooden toothpick—they snap off easily and will just make the blockage worse.
Once every port is clear, rinse the parts well and let them dry completely before putting everything back together.
My biggest piece of advice here? Make sure every single component is bone dry before you reassemble it. Even a tiny bit of moisture can mess with the igniter’s spark, landing you right back where you started.
As you can see, most of the common symptoms point back to these fundamental issues of cleanliness and proper alignment. That’s why we always start here.
Addressing the Igniter and Spark Module
If a thorough cleaning didn’t do the trick, it’s time to turn your attention to the igniter. That’s the little white ceramic piece responsible for creating the spark.
- Clean the Igniter: Grab an old toothbrush and a little rubbing alcohol. Gently scrub the metal tip of the igniter. Baked-on food can act like an insulator, preventing a strong spark.
- Check Alignment: Take a look and see if the igniter tip has been bent or knocked out of place. It needs to be close enough for the spark to jump the gap to the burner head.
- Inspect Wiring: With the power off, of course, do a quick visual check of the wires leading to the spark module (usually a small black box under the cooktop). Look for any connections that seem loose, frayed, or corroded.
Sometimes, a loose connection just needs to be gently wiggled back into place to restore the spark. For a deeper dive into these kinds of issues, check out our guide on why your gas stove won’t light and offers safe fixes.
By systematically working through these steps—cleaning the burners, clearing the ports, and checking the igniter—you can often get your cooktop working perfectly again without spending a dime on parts.
Handling Gas Leaks and Regulator Concerns
Of all the issues a gas cooktop can have, the smell of gas is the one that demands immediate attention. This isn’t a troubleshooting step; it’s an emergency. While many repairs are manageable for a handy homeowner, anything involving the gas line itself is strictly for the pros. Knowing how to react is non-negotiable.
The moment you smell that distinct “rotten egg” odour added to natural gas, your priorities change instantly. Don’t touch any light switches or appliances—turning them on or off can create a spark. Leave your phone where it is. Just focus on opening windows for ventilation, getting everyone safely out of the house, and calling your gas utility’s emergency line from a safe distance.
Can You Check for a Leak Yourself?
If you’ve just installed a cooktop or suspect a tiny leak at a connection you can easily see, there’s a quick diagnostic test you can run. This is only to confirm a problem, not to fix it. First, make sure the room is well-ventilated.
Then, mix up a 50/50 solution of dish soap and water. Use a small brush to dab it onto the connection between the gas line and the cooktop while the gas is on. If you see bubbles forming and growing, you’ve found a leak. Shut the gas off at the valve immediately and call a certified technician.
The key takeaway here is that this test is for diagnosis only. Never, under any circumstances, should you try to tighten or adjust gas fittings yourself. A certified gas technician has the right tools and training to secure the connection safely, without turning a small issue into a major hazard.
Spotting a Failing Gas Regulator
The gas pressure regulator is another critical part that is absolutely off-limits for DIY repairs. It’s the gatekeeper that controls the flow of gas from the main line to your burners, making sure the pressure is just right. When a regulator starts to fail, the symptoms usually show up on all burners at the same time.
Look out for these tell-tale signs:
- Flames that are way too high and roaring, often with yellow or orange tips.
- Very weak, pathetic flames that can barely stay lit, even when you turn the knob to high.
- The smell of gas that only appears when the cooktop is being used, which could mean the regulator is letting too much fuel through.
These are classic symptoms of a regulator problem. It’s a serious safety risk that requires a professional gas cooktop repair right away. In some regions, utility companies even offer support for safety issues like this. For example, some programs in California allow a SoCalGas technician to assess and repair appliances to boost safety and cut down on methane leaks. It’s worth checking out the details of these safety and efficiency programs to see what support might be available from your local utility.
A faulty regulator is your cooktop’s way of telling you it’s time to call in an expert. Don’t delay.
Knowing When to Call an Appliance Pro
Even the most seasoned DIY homeowner knows one thing: their limits. It feels great to fix a clogged burner or tighten a loose wire, but with gas cooktops, some problems are a clear signal to put the tools down and call a professional. A successful gas cooktop repair isn’t just about getting the flame back—it’s about making sure the job is done safely and correctly.
Trying to tackle complex gas components without proper training can quickly turn a simple fix into a dangerous hazard. Anything beyond basic cleaning and minor adjustments demands an expert’s touch and specialized tools most people just don’t have in their garage.
Red Flags That Demand an Expert
Some symptoms are non-negotiable. If you run into any of these issues, it’s time to call a certified technician, no questions asked.
- Malfunctioning Thermocouple: This is a crucial safety part that cuts the gas supply if the pilot light goes out. If a burner lights but immediately goes out once you let go of the knob, the thermocouple is the likely culprit. Replacing it means working directly with the gas valve assembly—a definite job for a pro.
- Faulty Control Valve: Is a burner knob stiff, hard to turn, or failing to adjust the flame properly from low to high? That points to a failing internal valve. This component controls the direct flow of gas and is absolutely not a part for amateur repair.
- Any Internal Gas Leak: You can easily check external fittings with a bit of soapy water, but if you smell gas and can’t find the source, it’s likely an internal leak. Locating and fixing this safely requires professional diagnostic equipment.
The biggest reason to hire a professional is for peace of mind. A certified repair ensures the work is up to code, uses the right parts, and is backed by a warranty. You can relax knowing your cooktop is safe, without worrying that a quick fix has created a more serious, hidden problem.
The Value of Professional Expertise
Hiring a technician isn’t just about safety; it’s about getting the job done right and efficiently. In California, the home appliance repair industry includes about 2,450 skilled workers, and these gas cooktop specialists have the training to spot issues that a DIY attempt might miss. You can explore more insights about the appliance repair workforce on bls.gov to see the scope of the industry.
Technicians are also up-to-date on the latest safety regulations and appliance technology. They can tell you whether an older cooktop can be safely repaired or if it’s time for a replacement that meets modern standards. Making that call can be tough, and our article on when to call an appliance repair technician offers a great breakdown. A pro will give you an honest assessment, saving you from throwing money at a failing unit that’s only going to cause more headaches later.
Simple Maintenance to Prevent Future Repairs
Honestly, the best repair is the one you never have to make. A little proactive care goes a long way in keeping your gas cooktop running safely and efficiently for years to come.
Most of the common problems we see—like stubborn igniters or uneven flames—are almost always caused by built-up grease and food spills. A simple, consistent maintenance routine is your best defence against those frustrating issues.
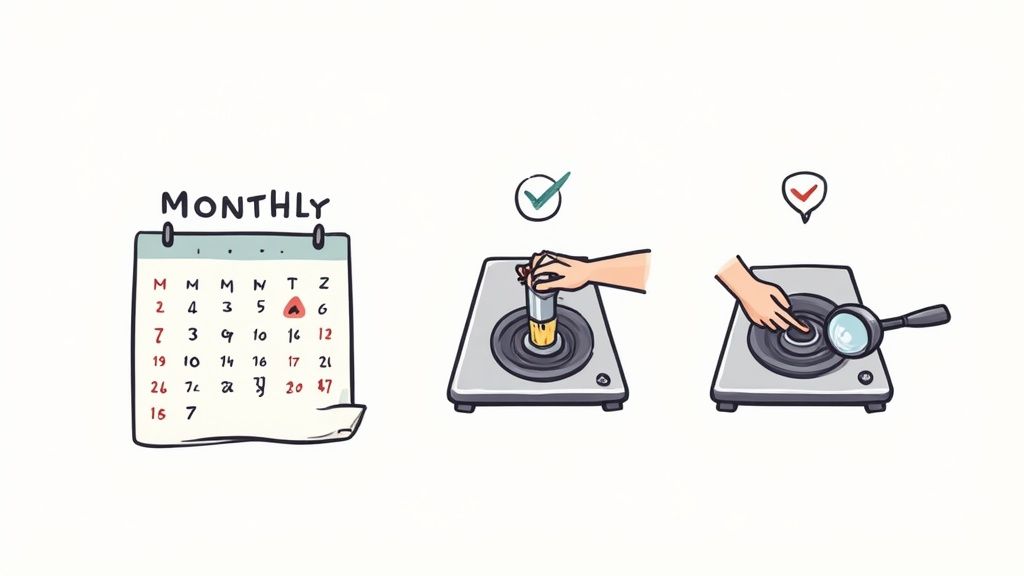
Your Monthly Maintenance Checklist
You don’t need to spend hours on this. Just a few minutes each month can make a massive difference. Think of it as a quick health check-up for one of your kitchen’s most important appliances.
- Look Things Over: Lift the grates off and get a good look at the burner heads and igniters. Are there any obvious cracks in the white ceramic igniters? Any significant rust on the burner components?
- Check the Flame Colour: Turn on each burner one by one. You’re looking for a steady, vibrant blue flame. If you’re seeing lazy, yellow, or orange flames, that’s a dead giveaway that the burners need a good cleaning.
- Test the Igniters: As you turn on each burner, listen and watch. Does the igniter spark right away, or is there a delay? A weak or slow spark is often just a sign of moisture or grime that you can easily clean off.
Surface-Specific Cleaning Tips
Cleaning your cooktop isn’t just about looks; it’s about preventing the gunk that causes most problems. But using the wrong approach can cause permanent scratches and damage. The trick is to match your cleaning method to the material.
In our experience, the number one cause of ignition failure is simply food debris getting in the way of the spark. A quick wipe-down after cooking and a monthly deep clean can prevent over 80% of these service calls.
For stainless steel, always use a soft microfibre cloth and a proper stainless steel cleaner. Make sure you wipe in the direction of the grain to avoid those fine scratches. If you have a porcelain enamel top, a non-abrasive sponge with warm, soapy water is your best friend.
Whatever you do, stay away from harsh chemical cleaners or scouring pads on any surface. They can strip the finish and leave lasting damage. By making these simple habits part of your routine, you’re doing more than just cleaning—you’re performing preventative maintenance that will keep your cooktop in top shape.
For more great tips, check out our guide on 6 ways to keep your appliances working their best.