So, you’ve loaded a pile of wet clothes, started your Samsung dryer, and come back an hour later to find them just as damp and cold as when you put them in. It's a frustratingly common problem, but the good news is that it’s often something you can fix yourself in just a few minutes.
A dryer that won't heat is almost always an issue of airflow. To prevent a fire hazard, your dryer is designed with safety features that shut down the heating element if air can't circulate properly. So, before you assume a major part has failed, let’s walk through the three most common culprits.
First, Check Your Dryer Settings
This might sound a little too simple, but you’d be surprised how often the wrong setting is the root of the problem. Modern Samsung dryers are packed with different cycles, and a few of them are designed to run without any heat at all.
- Air Fluff / Wrinkle Prevent: Make sure you haven't accidentally selected a no-heat setting like 'Air Fluff' or 'Wrinkle Prevent.' These cycles just tumble your clothes with room-temperature air.
- Eco Dry Mode: Another one to watch out for is the 'Eco Dry' setting. While it does use heat, it uses far less of it to save energy. This makes drying times much longer and can leave you thinking the heat isn't working at all.
Take a quick look at the dial or digital display. Confirm that a standard heated cycle like 'Normal,' 'Heavy Duty,' or 'Timed Dry' is selected. This simple check could save you a ton of hassle.
Next, Inspect the Lint Filter
Your dryer’s lint filter is the number one cause of heating problems. If you ignore it, you’re practically guaranteeing a breakdown. When that screen gets clogged, it traps hot, moist air inside the drum, which is a major red flag for your dryer's internal safety systems.
A packed lint filter forces the dryer to work harder, and its internal thermostats will detect the rising temperature. As a safety measure, the dryer will shut off the heating element to prevent overheating, even though the drum continues to spin.
Get into the habit of pulling out that filter and cleaning off the lint after every single load. It’s the single most important thing you can do for your dryer. For more context on general tumble dryer not heating issues, this guide offers some great extra tips.
Before we move on, let's put these initial checks into a simple list you can run through.
Quick Diagnostic Checklist For a Samsung Dryer Not Heating
Run through these simple checks first to solve the most common heating issues.
| Check Point | What to Look For | Actionable Solution |
|---|---|---|
| Cycle Settings | Is a no-heat or low-heat cycle like 'Air Fluff' or 'Eco Dry' selected? | Turn the dial to a standard heated cycle like 'Normal,' 'Heavy Duty,' or 'Timed Dry'. |
| Lint Filter | Is there a visible layer of lint covering the screen? | Pull out the filter and completely remove all lint. Do this after every load. |
| Exhaust Vent | Are there kinks in the vent hose or blockages at the outdoor flap? | Straighten any kinks in the hose and clear debris from the outside vent cover. |
If you’ve gone through this checklist and the problem persists, it’s time to look at the exhaust system more closely.
Finally, Examine the Exhaust Vent
If the lint screen is clear, follow the airflow path to the next potential bottleneck: the exhaust vent. This is that large, flexible duct that runs from the back of your dryer to the outside of your house. A clog here has the same effect as a full lint filter, just on a larger scale. For more info on how different dryer types handle venting, check out our types of dryers comparison guide.
Look for obvious kinks or crushing in the hose right behind the dryer. Then, head outside and check the vent flap. It's a common spot for birds to build nests, and it can also get blocked by leaves, snow, or other debris. Make sure that flap can open and close freely.
Essential Safety Steps Before Starting Your Repair
Before you even think about grabbing your tools, let's talk safety. It’s the single most important part of any DIY appliance repair. Jumping in without taking a few key precautions can quickly turn a straightforward fix into a dangerous mess, putting you and your dryer at risk.
Think of this as your non-negotiable pre-flight checklist.
First thing's first: kill the power. For an electric dryer, that means you need to physically pull that heavy-duty plug straight out of the wall. Just turning off the cycle isn't enough—you need to ensure there is zero electrical connection.
If you've got a gas dryer, there's one more crucial step. After unplugging it, you have to shut off the gas supply. Find the shutoff valve on the gas line that runs to your dryer and turn it so it's perpendicular to the pipe. That's the closed position.
Protecting Yourself and Your Appliance
With the power and gas off, it's time to gear up. The inside of a dryer is a maze of sharp metal edges and wiring, so personal protective equipment (PPE) is a must.
- Wear sturdy gloves: A good pair of work gloves will save your hands from nasty cuts and scrapes from the sheet metal.
- Use safety glasses: This one’s a no-brainer. Dust, lint, and maybe even a stray screw can go flying when you're working. Protect your eyes.
You'll also need a multimeter. It's not just for diagnosing parts; it’s a critical safety tool. You can use it to double-check that components like capacitors hold no residual charge before you handle them. If you're wondering whether you're really equipped for this kind of work, have a look at our guide on whether it is safe to repair your own appliances.
This flowchart gives you a good starting point for troubleshooting a Samsung dryer that’s not heating up. As you can see, it often starts with simple things like airflow and settings.

More often than not, the culprit is something simple and external, not a deep internal failure.
Gas Dryer Specific Precautions
Working with a gas dryer means you have to be extra vigilant. The risk of a gas leak is real, so always trust your nose. After you shut the valve, if you smell even a faint whiff of natural gas (that rotten egg smell), stop everything immediately. Open windows to ventilate the room, get everyone out, and call a professional gas technician from a safe distance.
Your safety goes beyond just unplugging the appliance. Knowing how to react in a worst-case scenario is just as important. For instance, a malfunctioning gas appliance can produce carbon monoxide, so it's vital to know what to do if your carbon monoxide alarm goes off. Taking these precautions seriously ensures your repair attempt is both successful and completely safe.
How to Test the Thermal Fuse and Thermostats
Alright, you've handled the easy stuff. Now it's time to get inside the dryer cabinet, where the most common culprits for a "Samsung dryer not heating" problem are usually hiding. First up is the thermal fuse—your dryer’s most important safety net—followed by the thermostats that actually control the heat.
Think of the thermal fuse as a small, one-time-use bodyguard. Its whole job is to blow and cut power to the heating system if the dryer gets dangerously hot. This isn't a malfunction; it's a safety feature doing its job. The number one reason it blows? A clogged vent, exactly what we talked about earlier. When that hot, moist air has nowhere to go, temperatures inside the dryer skyrocket, and the fuse sacrifices itself to prevent a fire.
Based on what we see in the field every day, a blown thermal fuse is the leading cause when a Samsung dryer stops heating. In fact, industry data shows that over 35% of no-heat repair calls come down to this one little part. Throw in the thermostats, and you're looking at nearly 60% of all heating failures. These are absolutely the first components you should suspect.
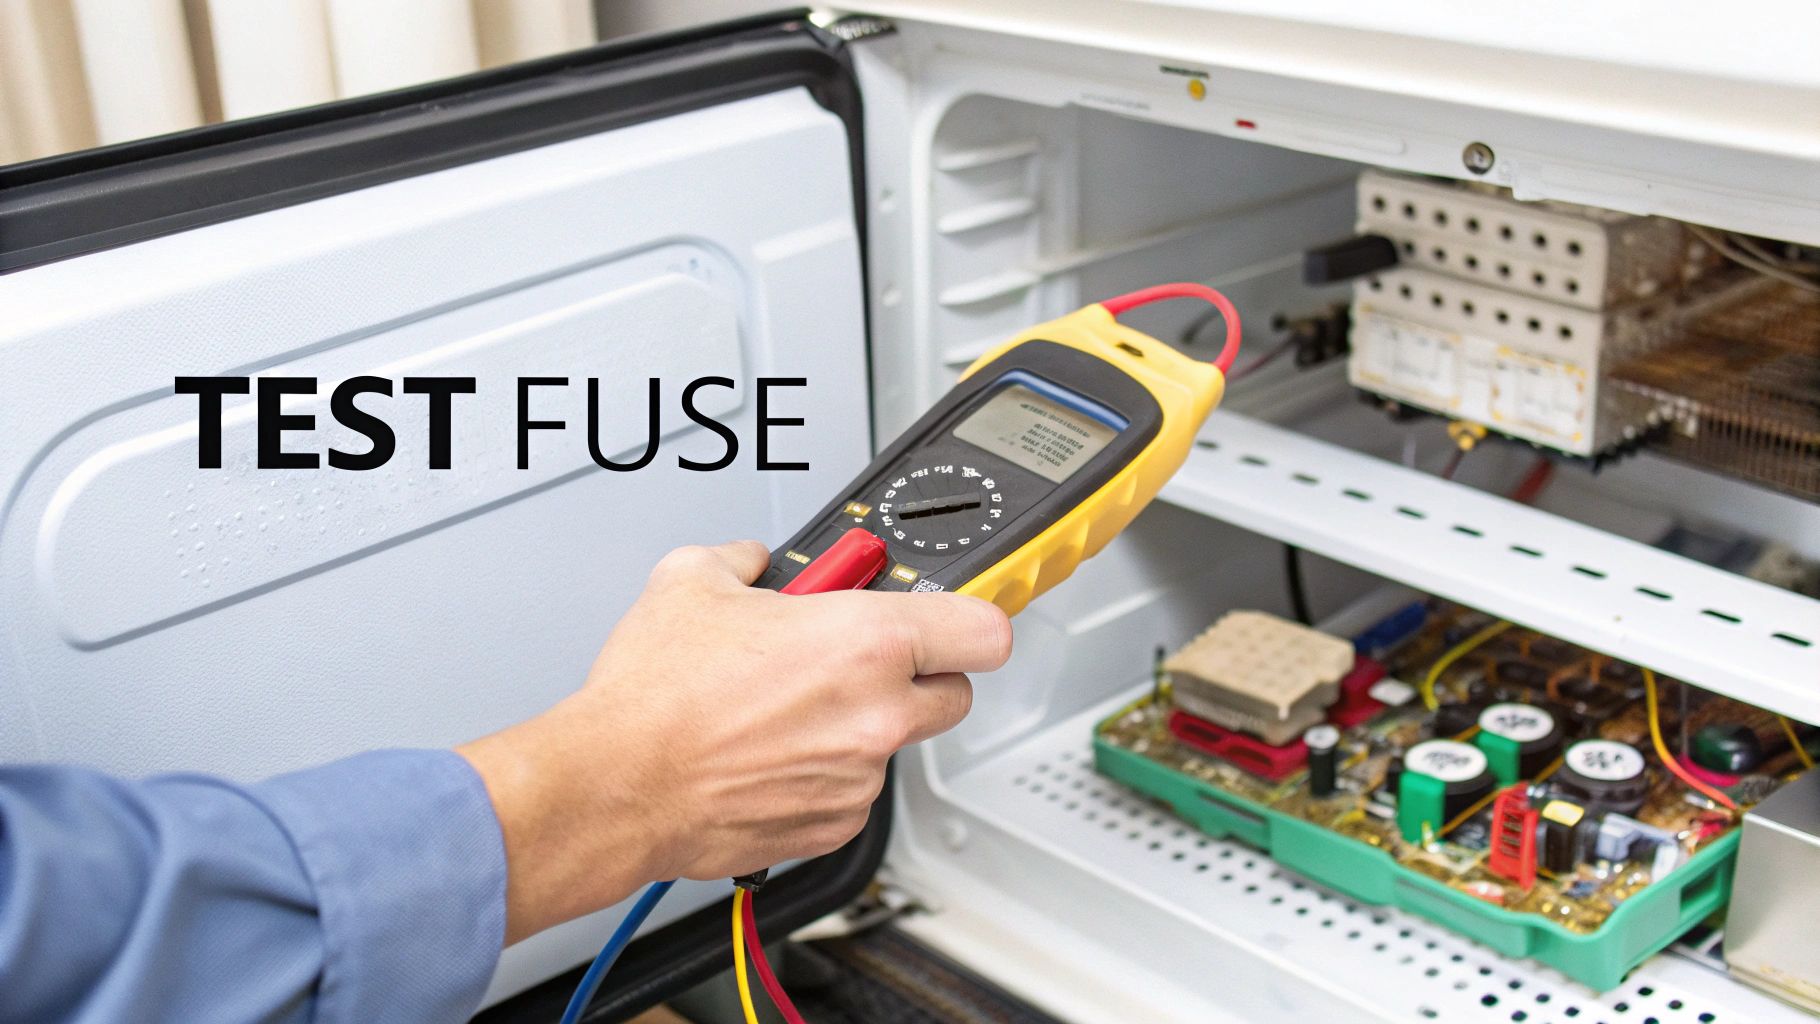
Finding and Testing the Thermal Fuse
First things first: unplug the dryer completely. Safety is non-negotiable.
To get to the fuse, you’ll likely need to take off the dryer's back panel, which is usually held on by a handful of screws.
With the panel off, scan the interior for a small, white plastic component that has two wires attached to it. It’s often mounted on the housing for the blower wheel or somewhere along the heating element duct. The exact spot can differ between models, so having a technical diagram for your specific dryer can be a real time-saver.
Once you’ve found it, you’ll test it for continuity with a multimeter.
- Set Your Multimeter: Switch the dial to the continuity setting. It usually has a symbol that looks like a sound wave (•))) or a diode.
- Disconnect Wires: Gently pull the two wire connectors off the terminals on the fuse.
- Test the Fuse: Touch one probe from your multimeter to each of the fuse’s metal prongs.
If you hear a beep or the screen reads zero (or very close), the fuse is fine. It has continuity. But if the multimeter stays silent and shows "OL" (which means overload or open loop), that fuse has blown. It's time for a replacement.
If you want to learn more about how this crucial part works, check out our guide on what a thermal fuse is and why it matters for your appliance.
Crucial Tip: Finding a blown thermal fuse is only half the battle. Don't just swap in a new one and assume you're done. A blown fuse is a symptom, not the root cause. The real problem is almost always poor airflow. You must clean the entire vent line—from the back of the machine all the way to the outside of your house—before running the dryer with the new fuse. Otherwise, you'll just blow the new one, too.
Diagnosing Your Dryer's Thermostats
If the thermal fuse passed the test, your next suspects are the thermostats. Most Samsung dryers have at least two of them: a high-limit thermostat and a cycling thermostat. These are also safety devices, but unlike the fuse, they’re designed to reset themselves.
- High-Limit Thermostat: This one is usually located right on the heating element housing. It’s another failsafe that cuts power if the temperature gets way too high.
- Cycling Thermostat: This is the workhorse that regulates the drum temperature during a normal cycle, switching the heater on and off to keep things at the right heat level.
The testing process is identical to the thermal fuse—you're checking for continuity. They look like small, round metal components, each with two wire terminals.
Find them near the heating element, disconnect their wires, and touch your multimeter probes to their terminals. At room temperature, both thermostats should show continuity (a beep or a zero reading). If either one reads "OL," it has failed and needs to be replaced.
Nailing down a faulty fuse or thermostat is a huge step. By testing these parts methodically, you can confidently find the broken piece and get your Samsung dryer back to doing its job.
How to Check the Heating Element or Gas Igniter
Alright, if you've worked through the thermal fuse and thermostats and they all checked out, it's time to go a little deeper. We're now heading to the heart of the heating system itself. For an electric dryer, that means the heating element. If you have a gas model, we'll be looking at the igniter assembly.
These parts don't fail as often as a fuse, but they're still common reasons for a "Samsung dryer not heating" headache. Getting this next step right requires a careful eye and a bit of testing to be sure.
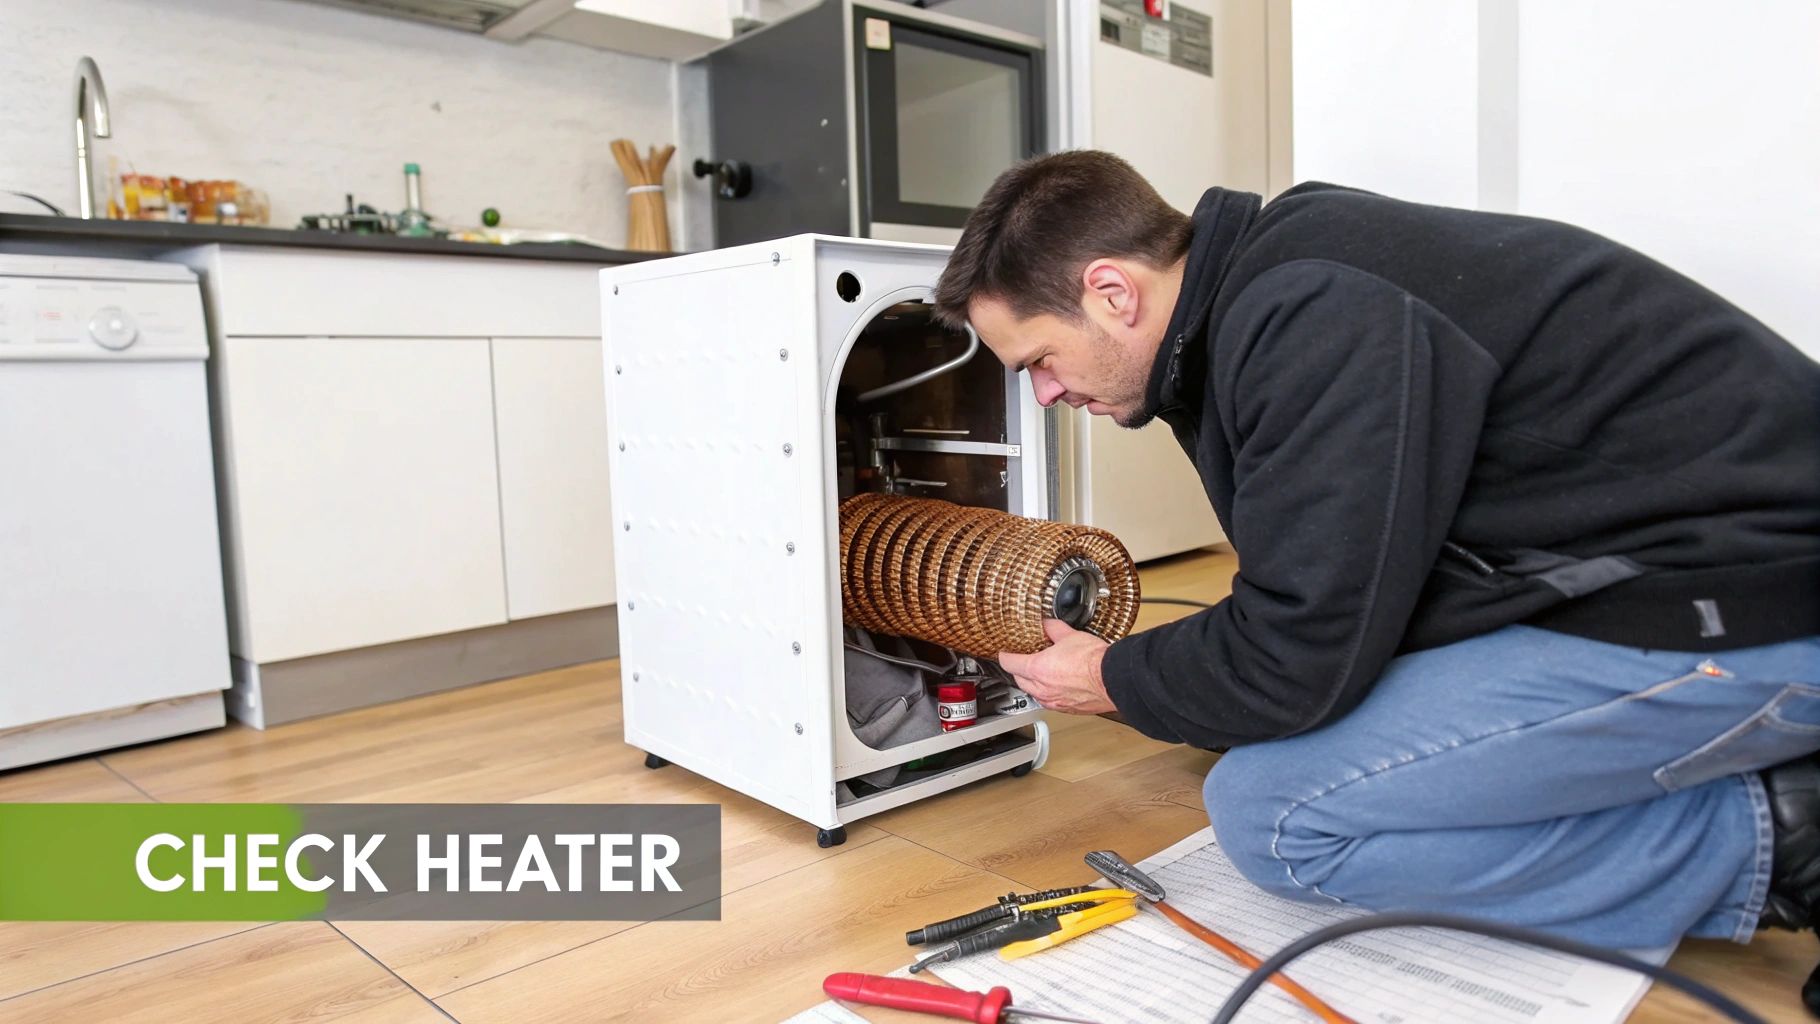
Checking the Electric Heating Element
Think of the heating element in your electric Samsung dryer as a massive, coiled wire tucked inside a metal canister. When the dryer sends power to it, the coil glows red-hot. The blower motor then pushes air across it, sending warm air into the drum. After years of heating and cooling, these coils can break or just burn out.
You'll likely need to remove the back panel to get to it, much like you did for the fuse. The element assembly is usually a rectangular metal box sitting near the bottom of the dryer.
Once you can see it, start with a simple visual check. You don't always need a tool to find the problem.
- Look for any obvious breaks or gaps in the wire coil.
- See any dark, charred-looking spots?
- Is the coil sagging or warped out of shape?
A visible break is a dead giveaway. If you spot one, you’ve found the culprit. The entire heating element assembly needs to be replaced.
If it looks fine, it's time to grab your multimeter for a continuity test. Disconnect the two wires from the element's terminals and touch one probe to each terminal. A healthy element should give you a reading somewhere between 7 and 12 ohms (Ω). If your meter reads "OL" (Open Loop) or infinity, the coil is broken internally, even if you can't see it. Time for a new one.
Diagnosing a Gas Dryer Igniter and Coils
If you're working with a gas Samsung dryer, the heating system is a whole different ball game. Instead of an electric coil, it uses a gas burner assembly. A small component called an igniter glows orange-hot to light the gas flame. More often than not, this is the part that fails.
To get a look at it, you’ll probably have to remove the front panel of the dryer or a smaller access panel down at the bottom. The igniter is a small, fragile-looking ceramic piece right on the burner tube.
Safety First: Before you go any further, make sure the dryer is unplugged and the gas supply valve is shut off completely. You can't be too careful when working with gas appliances.
Once you have eyes on the igniter, inspect it for any cracks, blisters, or a clear break in the white ceramic. It’s incredibly delicate, so be gentle. Any visible damage means it needs to be replaced.
If it looks okay, test it for continuity. Unplug its wire harness and touch your multimeter probes to its two leads. A good igniter will have a resistance reading between 50 and 400 ohms (Ω) at room temperature. An "OL" reading means it's toast.
Right next to the igniter, you'll find the gas valve coils. These are little solenoids that open the valve to let gas flow to the burner. If they fail, the igniter might glow perfectly, but since no gas is released, you'll never get a flame. Test these for continuity too. If one has failed, it's always best practice to replace them as a pair.
What If Everything Checks Out?
So, you've tested the heating element or the entire igniter assembly, and they're both fine. Now what? The issue could be buried in the control system. It's less common, but a faulty motor switch or a problem on the main control board can stop the heating circuit from ever getting the signal to turn on.
We also see thermostat-related failures in roughly 18-25% of Samsung dryer repairs. Your dryer relies on these to regulate the temperature and prevent overheating. When one fails, the dryer’s safety systems shut down the heat entirely. For more on how these systems work, you can always check your Samsung dryer's official documentation.
Diagnosing a bad control board or motor switch involves more advanced electrical testing, and it can get complicated fast. If you've confidently ruled out the fuse, thermostats, and the heating assembly, you might have reached the point where calling in a professional is the smartest move.
Knowing When to Call a Professional Repair Service
There's a point in every DIY repair where you have to ask yourself if it's time to step back. Knowing when to put down the tools isn't admitting defeat—it's making a smart call that can save you a world of frustration and money.
If you’ve already tested the thermal fuse, thermostats, and heating element (or igniter assembly on a gas model) and your Samsung dryer still isn't heating, you’re probably at that crossroads. The issue might be buried deeper in complex wiring, a faulty motor switch, or a fried main control board. These aren't simple plug-and-play fixes and often require specialized tools to diagnose correctly.
Weighing Your Options: DIY Versus Professional
Deciding to continue on your own or call a certified technician often comes down to a quick cost-benefit analysis. But it’s not just about the price of a part versus the cost of a service call. You have to factor in the hidden costs and risks of a complex DIY job.
- Tool Costs: Do you own a decent multimeter and the other tools for the job? Buying them for a one-off repair can quickly chew through any potential savings.
- Time Investment: A tricky diagnosis can easily eat up your entire weekend, from watching how-to videos to taking the machine apart and putting it back together again.
- Risk of Further Damage: One wrong move, like miswiring a control board, can fry other expensive components. That can turn a manageable repair into a complete write-off.
For a deeper dive, our guide on why you should hire a professional repair service can help you frame the decision beyond just the initial cost.
When you're dealing with complex electrical systems or gas lines, the margin for error is zero. A pro isn't just faster; they carry the right insurance and provide a warranty on their work. That peace of mind is priceless.
Your Local Solution in Alberta
If you've hit a wall or just want the problem solved quickly and correctly, that's what we're here for. For anyone in Edmonton, Calgary, Red Deer, and the surrounding areas, Advance Appliance Ltd. is your local expert. Our licensed technicians are trained to handle the complex issues that go way beyond a simple part swap.
We know Samsung dryers inside and out. Our service vehicles are stocked with the most common parts, so we can often get your repair done on the same day or the next day. Instead of spending your free time deciphering wiring diagrams, let a certified expert take care of it.
DIY Repair vs. Professional Service: A Quick Comparison
Still on the fence? This table should help you decide whether to press on with your DIY fix or bring in an expert.
| Factor | DIY Repair | Professional Service (Advance Appliance Ltd.) |
|---|---|---|
| Complexity | Best for simple, visible part swaps like fuses, thermostats, or heating elements. | Ideal for complex issues like control board failures, wiring problems, and gas system diagnostics. |
| Cost | You only pay for parts, but may need to buy tools. The total can rise if you misdiagnose. | You pay for parts and labour, but get a clear estimate upfront. No hidden fees. |
| Time | Can take several hours or even days, including research and part sourcing. | Most repairs are completed in a single visit, often on the same day you call. |
| Warranty | No guarantee. If the new part fails or the diagnosis was wrong, you're back at square one. | Our work is backed by a 90-day parts-and-labour warranty, ensuring the fix lasts. |
Ultimately, calling a professional is about getting your appliance—and your daily routine—back to normal with minimal hassle. If you've done the basic checks and are still stumped, give us a call.
Simple Maintenance to Prevent Future Heating Problems
After wrestling with a tricky repair, the last thing you want is a repeat performance. The best way to fix a "Samsung dryer not heating" problem is actually to stop it from happening in the first place. A simple, consistent maintenance routine is your best defence against future breakdowns and can seriously extend the life of your dryer.
These habits aren't complicated or time-consuming. In fact, they all boil down to one core principle: making sure your dryer can breathe.
Make Lint Screen Cleaning Non-Negotiable
The single most important thing you can do is clean the lint screen after every single load. I can't stress this enough. It’s not just a suggestion from the manual—it's a critical step that takes less than ten seconds but prevents the number one cause of dryer overheating.
When that screen gets clogged, hot, moist air gets trapped inside the drum. This forces your dryer's safety components, like the thermal fuse, to work overtime until they eventually fail. That failure is what leads directly back to the heating issues you just worked so hard to fix.
Schedule an Annual Deep Vent Clean
While the lint screen catches the obvious stuff, finer particles always slip through. Over a year, this lint builds up deep inside the flexible ducting behind your dryer and within the rigid pipe that runs to the outside of your home.
A dryer's efficiency is directly tied to its ability to exhaust hot air. An annual vent cleaning is like hitting the reset button for your dryer's entire system, restoring its performance and eliminating a massive fire risk.
This annual clean-up is more involved than just wiping the screen. You'll need to pull the dryer away from the wall to get access and use a specialized brush kit to clean out the entire length of the vent line. It’s a job you can definitely tackle yourself, but for total peace of mind, professional dryer vent cleaning services ensure every last bit of that hazardous lint is gone.
Create Space for Proper Airflow
Finally, take a quick look at the area around your dryer. The machine needs to pull in cool air from the room to work correctly. If it’s jammed into a tight closet or boxed in by laundry baskets, its intake vents can't do their job.
Just follow these simple placement rules:
- Leave Space Behind: Make sure there's at least 10-15 centimetres of clearance between the back of the dryer and the wall. This stops the vent hose from getting kinked or crushed.
- Keep the Sides Clear: A few centimetres of open space on either side of the appliance is all it takes.
- Avoid Clutter: Don't store things like detergent bottles on top of the dryer. It can block airflow and becomes a fire hazard if the machine overheats.
By turning these small steps into regular habits, you shift from reacting to problems to actively preventing them. It’s the key to keeping your Samsung dryer running efficiently for years to come.
Common Questions About Samsung Dryer Heating Issues
After going through the diagnostic steps, a few questions might still be lingering. It's totally normal. When your Samsung dryer isn't heating up, you want clear answers fast. Here are some of the most common queries we get from homeowners just like you.
Why Is My Samsung Dryer Running but Not Heating?
This is a classic scenario: the drum is tumbling away, but your clothes are just as damp as when you put them in. The good news is this tells you the motor is working fine, which helps narrow down the problem quite a bit.
The usual suspects are a blown thermal fuse, a dead heating element (on electric models), or a faulty igniter (on gas models). Since the motor is good, you can forget about major power supply issues and zero in on the parts that actually create the heat. But before you start taking things apart, check that vent. A clog is the number one reason a thermal fuse blows in the first place.
How Much Does It Cost to Fix a Samsung Dryer That Is Not Heating?
The cost really depends on what’s broken and if you’re comfortable doing the repair yourself. For a DIY fix, a simple part like a thermal fuse or thermostat can set you back as little as $20 to $60. If the heating element is the problem, the part itself usually costs between $70 and $150.
Hiring a professional, of course, includes parts and labour. A straightforward fuse swap could be anywhere from $150 to $250. A more involved job, like replacing a heating element or a gas igniter, will likely fall in the $250 to $450 range. Any reputable technician will give you a clear, upfront estimate before they even pick up a tool.
Can a Clogged Vent Cause My Dryer to Stop Heating?
Yes, a thousand times yes! A clogged vent is probably the most common culprit behind a no-heat issue. When the hot, moist air has nowhere to go, it gets trapped inside the drum, causing the internal temperature to spike dangerously high.
This intense heat is exactly what the thermal fuse is designed to detect. It acts as a safety switch, blowing itself to cut power to the heating system and prevent a potential fire. Your dryer won't produce any heat again until that fuse is replaced and—this is the crucial part—the vent is thoroughly cleaned out.
What Do HE or tE Error Codes Mean on My Dryer?
Those little codes on the display are your dryer's way of telling you where it hurts.
- HE Code: Think "Heating Error." This code usually means the dryer has detected a problem with regulating its temperature. It often points to a failing heating element or a bad thermostat.
- tE Code: This one (or something similar like tC) typically signals a thermistor error. The thermistor is the sensor that reads the air temperature and tells the control board when to turn the heat on and off. If it's on the fritz, the dryer won't heat properly.
It's always a good idea to double-check your user manual, as the exact meaning of these codes can vary slightly between different Samsung models.
If you've tried everything and you’re still stuck with a cold dryer, the experts at Advance Appliance Ltd are here to help. We provide same-day and next-day service across Edmonton, Calgary, Red Deer, and the surrounding areas. Let us get your laundry routine back on schedule. For a fast, professional repair, you can book a service with Advance Appliance Ltd online.